
Azure, Packer, PowerShell: Creating Citrix Golden Images – Part #1
Yes, another boring post around creating Golden Images in Azure via Hashicorp Packer and PowerShell. There are quite a few blog posts, GitHub repos, and examples of the quick and easy ways to automate this process. So why create another blog? The majority of examples I found out there were pretty simple, in the fact that they would spin up an Azure VM, install role/feature (example: IIS) or download an application from chocolatey (example: notepad++) and seal everything up. Maybe it’s just bad luck, but the images I usually see have a crap ton of apps, configurations, and settings defined.
I have the most experience building images with Microsoft Deployment Toolkit (MDT). Some of these images contain hundreds of applications and customization that are installed and configured from a multitude of sources, such as local network shares, mapped drives, Chocolatey, PowerShell gallery, etc…
The goal of this multipart series will showcase the necessary framework/code that is required to store secrets, use environment variables, run PowerShell, and use Packer to build Images.
Prerequisites
- A device with Windows OS and PowerShell to kick everything off
- PowerShell
- Azure Module
Install-Module -Name Az -AllowClobber -Scope CurrentUser -Force
- Azure Profile
- #https://www.tutorialspoint.com/how-to-connect-azure-account-using-powershell
- Option 1 (Automated)
Connect-AzAccount -Subscription "<Azure Subscription Name"  #Used for Auth, if on Azure Government, use "-Environment AzureUSGovernment" parameter
Save-AzProfile -Path MyAzureProfile.JSON
- Option 2 (Manual)
Connect-AzAccount
- Option 1 (Automated)
- #https://www.tutorialspoint.com/how-to-connect-azure-account-using-powershell
- Azure Module
- PowerShell
- Azure subscription
- Service Principal created with Contributor role – https://gmusumeci.medium.com/how-to-use-packer-to-build-a-windows-server-image-for-azure-52b1e14be2f2
az login
az account list --output table #to get subscriptions
az account set --subscription <Azure-SubscriptionId>
az ad sp create-for-rbac --role="Contributor"
--scopes="/subscriptions/SUBSCRIPTION_ID"
- Azure Vault to store SPN clientSecret
- Service Principal created with Contributor role – https://gmusumeci.medium.com/how-to-use-packer-to-build-a-windows-server-image-for-azure-52b1e14be2f2
- Download my Github repo – https://github.com/StevenNoel/Packer-Azure-Powershell
- Download Packer – https://developer.hashicorp.com/packer – Put executable into the same directory you downloaded from GitHub.
Let’s begin.
I’ll be using this script to kick everything off: Azure-Packer-Citrix-Stage.ps1.
Let’s go through the code so I can explain some of the logic, as well as different ways things can be automated based on your preference, comfortability, an security posture.
#Install Azure Module
Install-Module -Name Az -AllowClobber -Scope CurrentUser -Force- This simply just loads the Azure PowerShell modules into PowerShell.
#Packer service account
#set up path and user variables
    $AESKeyFilePath = "\\ServerName\Share\folder\aeskey.txt" # location of the AESKey
    $SecurePwdFilePath = "\\ServerName\Share\folder\credpassword.txt" # location of the file that hosts the encrypted password
    $userUPN = "DomainA\Username" # User account login

    #use key and password to create local secure password
    $AESKey = Get-Content -Path $AESKeyFilePath
    $pwdTxt = Get-Content -Path $SecurePwdFilePath
    $securePass = $pwdTxt | ConvertTo-SecureString -Key $AESKey

    #crete a new psCredential object with required username and password
    $scriptCreds = New-Object System.Management.Automation.PSCredential($userUPN, $securePass)
$MDTpacker = $scriptcreds.GetNetworkCredential().password- This is one way I’m able to get/store the credentials of an AD user account and apply them via packer json/hcl. You may choose this method, you may choose to prompt the user, or store them in a Vault. All depends on your definition of security and automation. At the bare minimum: Don’t leave plain text passwords in your code!
$AdminUser = "SuperSecretPassword"- This is me defining an additional administrator user account password. In Azure, Packer will actually store a cert in a vault and use that to login to the machine via WinRM. However, there might be times when you need to run things as local admin. Remember how I just said DON’T STORE PLAINTEXT PASSWORDS IN HERE!! A better way might be to use PowerShell to generate a random password, use the AES/PWD file technique (like above), or use the same method we use for the Service Principal account, just store it in the vault.
#Auth to Azure
$profilepath = "C:\Users\<username>\MyAzureProfile.JSON"
$profile = Import-AzContext -Path $profilePath
$SubscriptionID = $profile.Context.Subscription.SubscriptionId
Set-AzContext -SubscriptionId $SubscriptionID- This is one method you can use to authenticate to azure without being prompted every time. Of course you’d want to lock down the MyAzureProfile.json file via NTFS security or some other method. In order to use an azure profile you first use the Connect-AzAccount module, enter your credentials, then use the Save-AzProfile -Path C:\Users\<username>\MyAzureProfile.json. Again, it’s just another way to use credentials without putting them in plaintext in your scripts.
#Get Values for Packer
$Vault = "<Azure Vault>" #Vault where Service Principle Secret is stored
$ClientID = "<Service Principle Client ID>"
Get-AzKeyVault -VaultName $Vault #Verify Vault
$ClientSecret = Get-AzKeyVaultSecret -VaultName $Vault -Name $ClientID -AsPlainText- In the prereqs we created an Azure Service Principal and stored the ‘secret’ in a vault. This is the account that Packer uses to interface with Azure (creating/destroying VMs, building vnets, etc…). In this block of code I’m defining what vault I stored the secret in, obtaining the value, and storing it in a value, that we will later store in an environment variable, to hand off to packer.
#Computername for Packer
$PackerCompName = "ctxaz" + $(Get-Date -Format "yyMMddHHmm")

#Image Name in Azure
$managed_image_name = "Citrix-Azure-Image-" + $(Get-Date -Format "yyMMdd-HHmm")- By default VMs created by azure will be prefixed with ‘pk******’ and some random characters. If you would prefer a different prefix to differentiate lines of businesses or other needs then you can set the $PackerCompName. The $managed_image_name is the name of the final image that gets created.
#Set Values as Env Variables
[System.Environment]::SetEnvironmentVariable('AZURE_CLIENT_ID',"$ClientID",[System.EnvironmentVariableTarget]::User)
[System.Environment]::SetEnvironmentVariable('AZURE_CLIENT_SECRET',"$ClientSecret",[System.EnvironmentVariableTarget]::User)
[System.Environment]::SetEnvironmentVariable('AZURE_PackerCompName',"$PackerCompName",[System.EnvironmentVariableTarget]::User)
[System.Environment]::SetEnvironmentVariable('AZURE_ManagedImageName',"$managed_image_name",[System.EnvironmentVariableTarget]::User)
[System.Environment]::SetEnvironmentVariable('AZURE_MDT',"$MDTPacker",[System.EnvironmentVariableTarget]::User)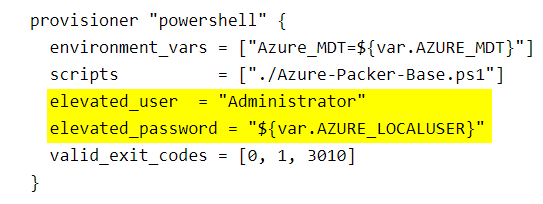
[System.Environment]::SetEnvironmentVariable('AZURE_LOCALUSER',"$AdminUser",[System.EnvironmentVariableTarget]::User)- One way to not put passwords in your Packer json/hcl files is to store them as environment variables. you can then reference the environment variables in your json/hcl file without plaintext format. You’ll see in the later section we clear these variables after the build completes. Again, just one way of many to avoid having clear text creds in your code.
#Set the location of where Packer and Azure config is stored
#Packer
set-location -path "\\ServerName\Share\folder"
./packer.exe validate .\Packer-CTXAZPK-VDA-Citrix.pkr.hcl  #Validate Packer HCL/JSON
./packer.exe build .\Packer-CTXAZPK-VDA-Citrix.pkr.hcl #Build from Packer HCL/JSON- This code block is where we set the location of where the json/hcl file is stored. In this situation the Packer.exe is also located in the same directory. Then we tell Packer to ‘analyze/validate’ the json/hcl file to find any errors. Next we tell Packer to start the actual ‘build’. This is where everything happens as far as building.
#Remove Envivronment Varible Values
[Environment]::SetEnvironmentVariable("AZURE_CLIENT_ID", $null ,"User")
[Environment]::SetEnvironmentVariable("AZURE_CLIENT_SECRET", $null ,"User")
[Environment]::SetEnvironmentVariable("AZURE_PackerCompName", $null ,"User")
[Environment]::SetEnvironmentVariable("AZURE_ManagedImageName", $null ,"User")
[Environment]::SetEnvironmentVariable("AZURE_MDT", $null ,"User")
[Environment]::SetEnvironmentVariable("AZURE_LOCALUSER", $null ,"User")- This last section simply removes the environment variables we defined earlier, to clear out any sensitive data.
In the next Part, I’ll go into what the HCL/JSON file actually looks like, that defines our build process, as well as any gotchas I’ve encountered along the way.
Hope this post helps you getting started with Packer in Azure and also helps understand the different ways we can automate the storing of credentials and sensitive variables that packer needs to complete the build. For simple builds where you are only installing a few roles, most of this isn’t needed, especially if you aren’t mapping any drives or installing any applications via UNC/Network paths.
Part 1 – This Post (staging)
Part 2 – https://verticalagetechnologies.com/index.php/2023/06/28/azure-packer-powershell-creating-citrix-golden-images-part-2 (json/HCL)


One Comment